Friday, January 20, 2012

Bacon, Leek and Cheddar Mini Quiches

I know I promised I would be posting about my recent travels, but I have much to share about my discoveries in the Caribbean and so it is taking longer than I had anticipated.  Rather than keeping you waiting, I wanted to give you an opportunity to try another delicious appetizer I made for the holiday party in PA.

I can not explain why, but for about the past 6 months I have really wanted to bake something in mini-muffin tins, besides mini-muffins of course.  Way back in the day I had seen a variety of mini-muffin tin recipes from cornbread bites topped with a tomato relish, to bacon and egg bites.  Entertaining opportunities came and went and I had yet to try one of these easy to eat creations.  Hence, when my mother-in-law suggested making Bacon, Leek and Cheddar Mini Quiches for the party I was all for it!  I had never cooked with leeks either so that was an added bonus!
Side Note: Yes, I get excited about leeks and mini muffin tin recipes.  It is all about the small things in life. Don't judge.

 Anyway, here is the run down on the mini quiches:
  • Making the filling for the quiches is easy and can probably be done a day ahead of time and kept in the fridge if needed
  • The crust is what takes some time.  My wonderful husband helped me by rolling out the pastry and cutting the circles while I placed the dough in the tins and scooped the filling.  Having the two of us working together made this much easier and saved us some time.  If you do decide to make these, just don't leave it until the last minute
  • We froze the filled quiches and cooked them the following day and it worked perfectly.  It made it much easier to have them out hot when people were hungry, which was difficult since we had people dropping in and eating over the course of about 6 hours
  • When it comes to taste...these are delicious!  The leek and cheddar are the most prominent flavors and are a great combination with the egg.  Depending on how equally divided the filling is, the bacon promises an added bonus but is not necessarily in every bite.  
  • The quiches are slightly crispy on the outside with a fluffy, egg filled middle and are great finger foods.  Each one is bite size so it is a perfect dish for making it easy to eat, drink and chat without feeling like you are going to spill your food everywhere
  • Definitely worth trying when you have the time to assemble them!
     Bacon, Leek and Cheddar Mini Quiches
    Yields 4 dozen quiches - made in mini muffin tins

    Ingredients
    • 3/4 lb bacon, cooked crispy and diced into medium chunks
    • 3 C leeks, white and light green parts only, medium diced
    • 1-1/4 C half and half
    • 1 C grated cheddar cheese
    • 2 large eggs
    • 2 egg yolks
    • 2 T fresh thyme leaves, chopped
    • 1 t salt
    • 1/2 t fresh ground black pepper
    • 1/4 t nutmeg
    • 1 package of frozen puff pastry, using both sheets, thawed (I use Pepperidge Farms)
    • cooking spray
    • flour as needed for rolling pastry
    Directions
    1. In a medium skillet, cook the bacon until browned and crispy - about 6 to 8 minutes.  Using a slotted spoon transfer to a paper towel lined plate.
    2. Pour off all of the excess fat, reserving about 1-2 tablespoons in the skillet
    3. Return the skillet to heat and, stirring occasionally, cook the leeks until softened, about 5 minutes.  Set aside and allow to cool slightly
    4. While leeks are cooling, combine the half and half, egg, egg yolks, thyme, salt, pepper, and nutmeg in a medium bowl
    5. Add cooled leeks and bacon to the liquid mixture and stir to combine
    To assemble the mini quiches:
    1. Spray the mini muffin tins with cooking spray.  If you do not have 4 dozen mini muffin tins, assemble the quiches in batches and store mixture in the fridge while one batch cooks
    2. To assemble, roll out one thawed puff pastry sheet on a floured surface sing a floured rolling pin.  Roll until the pastry measures about 10"x18".  I realize this seems rather large, but trust the capabilities of your puff pastry and make sure it is well floured to make it easy to roll out to this size!
    3. Once pastry is rolled, use a 3 inch circle cookie cutter (or something around 3 inches) to stamp out 3 inch circles of dough.  Each rolled out pastry will yield about 2 dozen quiches
    4. Gently press the rounds into the mini muffin tins so the pastry comes slightly above the min quiche holes
    5. Fill each dough round with about 1 T of the filling.  It is okay if the filling comes up to the edge of the dough.
    6. Bake the quiches immediately, or freeze them to bake at a later time.  They will keep for about a month if you choose to freeze them.  If you have limited tins you can freeze these in batches.  Simply place the filled tins in the freezer for about an hour.  Once frozen, remove the quiches from the tin and store in an airtight container.  Repeat after assembling all batches.  When baking, quiches will need to be returned in batches to the mini muffin tin.
    7. To bake the quiches, preheat the oven to 400 degrees.  Bake until the filling is puffed up and the crust is golden, about 20 minutes if you bake immediately, about 30-35 minutes if the quiches are frozen.  If you choose to freeze the quiche, do not thaw before baking.  Simply place frozen quiches back into the muffin tins (if removed for freezing) and bake as mentioned above.
    BON APPETIT!

      Thursday, January 12, 2012

      Pumpkin Garlic Knots

      Happy New Year Everyone!  I just returned from a wonderful trip to the Caribbean where I spent some time in St. Kitts and Nevis as well as in St. Thomas and St. JohnEach place was spectacular and unique and I can't wait to share my experiences with you.  Look for some getaway updates soon!
      Ingredients for your next creation
      In the mean time, I wanted to share a recipe with you that I tried during the holidays this year.  I found this recipe through foodgawker.com on the blog Handle the Heat.
      This is definitely a website I plan to follow from now on and I know I will make these Pumpkin Garlic Knots for many years to come!  They were a hit at both Thanksgiving and Christmas and could easily be made throughout the year by omitting the pumpkin, although I have yet to try this.
      These knots were my first attempt at a yeast bread without my trusty bread maker and it was so easy!  The knots are slightly crispy on the outside and as you take a bite you are hit with the wonderful flavors of garlic and oregano.  As you reach the fluffy middle of the bread, the garlic and oregano flavors begin to subside leaving you with slight pumpkin flavor and a whole lot of satisfaction. 


      Pumpkin Garlic Knots
      Yield: 2 batches - about 18 knots total

      Ingredients:
      • 1 C warm water
      • 1 envelope active dry yeast
      • 2 T honey
      • 1/2 C canned pumpkin
      • 2 T plus 1/3 C olive oil
      • 1-1/2 t coarse kosher salt
      • 3-1/2 C bread flour
      • 3 cloves garlic, minced (I really enjoy garlic, so the second time around I added more)
      • salt & freshly ground pepper
      • 1/2 teaspoon dried oregano leaves
      Directions:

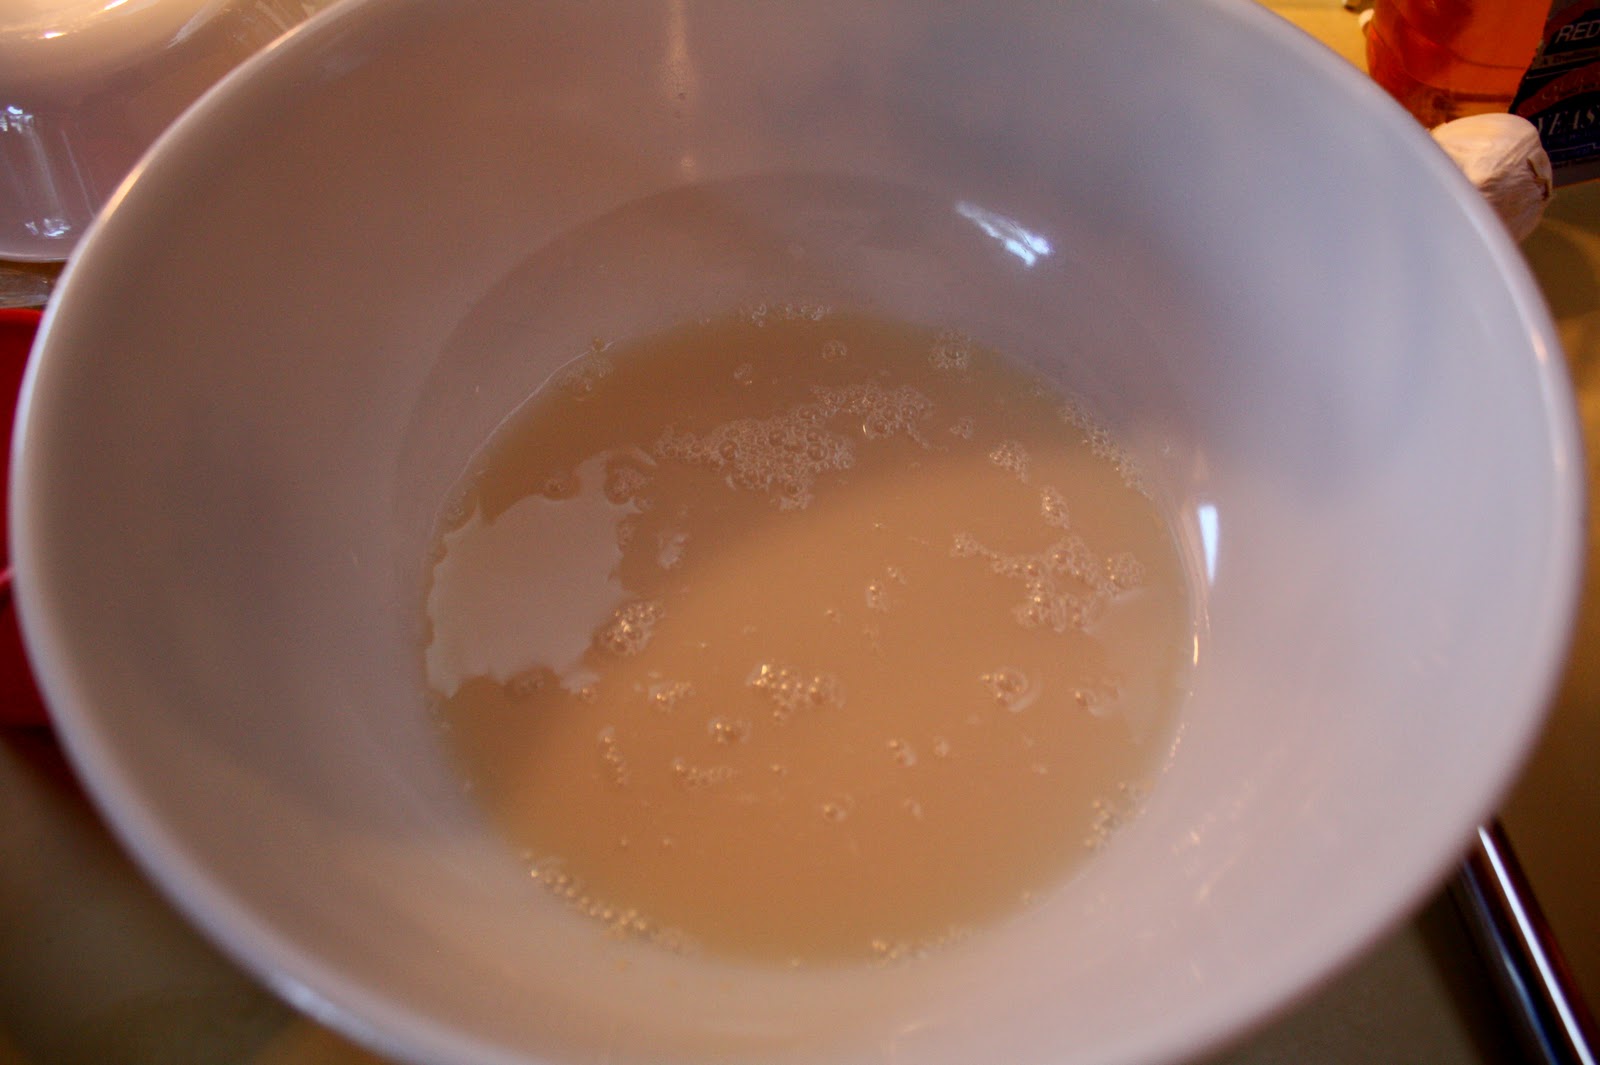
      1. For the dough: Pour the warm water into a medium bowl and whisk in the yeast. Let sit until frothy, about 10 minutes. Note-the water doesn't get extremely frothy although bubbles will be present. Whisk in the honey, 2 tablespoons olive oil, and pumpkin puree.

      This is considered "frothy" in step 1
      2. In a large bowl, whisk together the flour and salt. Make a well in the center of the dry ingredients then pour in your wet ingredients.

      3. Using a rubber spatula, mix ingredients together. When you can no longer mix, use your hands to start kneading the dough. Knead the dough until it comes together in a smooth and elastic ball, adding flour as necessary to prevent sticking.

      4. Lightly oil another large bowl and put your dough ball inside it -- flipping over once to coat both sides lightly with oil. Cover with a damp towel and let rise for about 2 hours; or until nearly doubled in size.  It is okay if it needs to sit slightly longer than two hours.
      5. Preheat oven to 425 degrees F.  If you are making the knots all at once, proceed to step 6. If you plan on only making one batch, divide the dough into two equal pieces. If you're planning to use the other half the next day, just put it in a large zip-lock bag and store in the fridge. You may also freeze the dough for up to three weeks. 
      6. To create the garlic knots: tear off sections of dough (2 tablespoons at a time) and roll them into a long snake shape. Tie that snake in a knot. Set aside and continue with the rest of the dough.  As you make knots, place them on a cookie sheet.

      7. Once you've made all your knots, put the pan in the oven and let bake until golden brown on the tops, about 10-15 minutes depending on size of knots.

       8. While the knots are baking, in a bowl mix together the 1/3 cup olive oil with minced garlic, salt, pepper, and oregano. When the knots are done, use a pastry brush to coat the knots with olive oil mixture.

      9. Serve and Enjoy!! 

      Bon Appetit!

      Monday, December 26, 2011

      Grilled Chicken Satay with Peanut Butter Dipping Sauce

      As I briefly mentioned in my previous post, my in-laws hosted a wonderful holiday party while we were visiting.  It was a wonderful way to meet some of their friends and spend time with our wonderful friends, AND it was an amazing way to discover some new recipes and get a solid amount of time in the kitchen.  What a bonus!  

      Being this was my first year not being with my family for the holidays, it was great to find ways to make Christmas somewhere new to feel like Christmas with my family.  I always help my mom cook during the holidays, so planning the menu with my mother-in-law and cooking for this party made me feel a little closer to home!

      We prepared many delicious appetizers which I will blog about when I return from my honeymoon (yay!), but I couldn't wait to share my favorite of them all, Grilled Chicken Satay with a Peanut Dipping Sauce.  The chicken marinade was a recipe we found at a blog called Dishing Up Delights, and the sauce was by the Barefoot Contessa and was found on Food Network.

      The grilled chicken was delicious on its own and had a wonderful flavor.  The cilantro and garlic make a delicious savory combination, and the red pepper flakes add just enough kick to give it a little extra something something.  The sauce was also delicious and combined my favorite, peanut butter, with the sweet, salty and sour flavors of brown sugar, soy sauce and vinegar.  It wouldn't hurt to add more peanut butter the next time around, but the sauce was delicious and was definitely a hit!

      The party was large so we quadrupled the recipe and it worked out great for the chicken.  We should have only doubled the sauce because we had WAY too much when the recipe was quadrupled, but we later mixed it in with a stir fry which was absolutely delicious!

       Chicken Satay Skewers 

      Ingredients

      • 2 boneless chicken breasts, cut into thick strips to weave onto skewers
      • 2 t sesame oil
      • 2 t soy sauce
      • 1 garlic clove, minced
      • salt and freshly ground black pepper
      • 1/4 t red pepper flakes
      • 1 to 1-1/2 T chopped cilantro
      Directions:
      1.  Prepare chicken and place in a bowl with a lid
      2. Combine sesame oil, soy sauce, garlic, salt, pepper, red pepper flakes, and cilantro and pour over chicken
      3. Cover bowl with lid and toss to combine
      4. Cook immediately or refrigerate until you plan to grill (we marinaded the chicken overnight)
      5. When prepared to grill, soak wooden skewers for 15 minutes and then thread with the chicken
      6. Grill chicken over medium high heat until cooked through, about 2-3 minutes per side
      7. If feeding a large group, cut skewers in half to make appetizer size bites; otherwise, serve immediately!
      Satay Peanut Dip: 

      Ingredients:

      • 1 T olive oil
      • 1 T sesame oil
      • 2/3 C small diced red onion (1 small onion)
      • 1-1/2 t minced garlic (2 cloves)
      • 1-1/2 teaspoons minced fresh ginger root
      • 1/4 t red pepper flakes
      • 2 T red wine vinegar
      • 1/4 C light brown sugar, packed
      • 2 T soy sauce
      • 1/2 C smooth peanut butter (add more if you want a more peanuty flavor)
      • 1/4 C ketchup
      • 2 T dry sherry
      • 1-1/2 t lime juice
      Directions:
      1. Note: Rather than chopping some of the sauce ingredients, I put the red onion, garlic, and ginger root in a small food processor so it would be diced small
      2. Cook the olive oil, sesame oil, red onion, garlic, ginger root, and red pepper flakes in a small, heavy-bottomed pot on medium heat until the onion is transparent, 10 to 15 minutes. 
      3. Whisk in the vinegar, brown sugar, soy sauce, peanut butter, ketchup, sherry, and lime juice; cook for 1 more minute. Cool and use as a dip for Chicken Satay Skewers
      I hope you enjoy these as much as I did.  If you try them, please let me know what you think!
      After the honeymoon I will have some wonderful getaway posts along with the other dishes we made for our holiday feast!  Stay tuned and have a very Happy New Year!

      Bon Appetit!

      Sunday, December 25, 2011

      Oatmeal Fudge Bars

      The recipe comes from Chocolate Desserts: The Absolute Best Chocolate Recipes Ever, a magazine my mother-in-law showed me when we were planning the menu for a holiday party at her house.  All the food at the party was a huge hit (look for upcoming posts!) including these Oatmeal Fudge Bars.

      These bad boys have a hint of espresso flavor wrapped up in all the goodness of an oatmeal cookie combined with a fudge brownie...could it get any better?  These oatmeal fudge bars take some time, but are not too difficult and well worth the calories.  Goodness in every bite!

      I decided I should share this recipe after multiple people at our holiday party either commented on the deliciousness of the bars or threatened to smuggle the tray into their car.  They are a tasty treat and are perfect for holiday parties / work functions / dinner parties etc. They are sure to be a crowd pleaser!


      Oatmeal Fudge Bars (yields about 3 dozen bars)
      Ingredients for crust / topping:
      • 2 C quick oats
      • 2 C packed light brown sugar
      • 1-1/2 C all purpose flour
      • 1/2 t baking powder
      • 1/2 t baking soda
      • 1/4 t salt
      • 16 T (2 sticks) unsalted butter, melted and cooled
      Ingredients for filling:
      • 1/2 C all purpose flour
      • 1/2 C packed light brown sugar
      • 4 t instant espresso or coffee powder
      • 1/2 t salt
      • 3 C semi-sweet chocolate chips
      • 4 T unsalted butter
      • 2 large eggs
      Directions for crust and topping:
      1.  Adjust oven rack to middle position and heat oven to 325 degrees.  Line 8 inch square baking pan with foil and grease foil.
      2. Whisk oats, brown sugar, flour, baking powder, baking soda, and salt together in a large bowl.  Stir in melted butter until combined.  Reserve 1-1/2 C oat mixture for the topping.
      3. Sprinkle remaining oat mixture into prepared pan and press into even layer with bottom of measuring cup.  Bake until crust is light golden brown, about 8 minutes, potentially a bit longer.  Let crust cool in pan on wire rack, about 1 hour.
      Directions for filling:
      1.  Whisk flour, sugar, instant espresso, and salt together in medium bowl.  
      2. **Don't begin the next step too early to avoid chocolate hardening**  When the crust is close to being cooled, place chocolate chips and butter in microwave safe bowl and microwave, stirring every 30 seconds or so, until the chocolate is melted, approx. 1 - 3 minutes.  Once chocolate mixture has cooled very slightly whisk in egg until combined.  Stir in the flour mixture until just incorporated.
      3. Heat oven back to 325 degrees.  Spread filling evenly over cooled crust and smooth the top.  Sprinkle the fudge with the reserved oat mixture.  Bake bars 25-30 minutes or until a toothpick inserted into the middle comes out with a few moist crumbs attached, maybe a tiny amount of chocolate, and the filling begins to pull away from the side of the pan.  It may help to rotate the pan half way through baking.
      4. Let bars cool for two hours in a pan set on a wire rack.  Remove bars from the pan using foil, cut bars into squares and serve.
      Please let me know if you try these and enjoy them!

      Bon Appetit!

      Saturday, December 24, 2011

      Lennie's Hoagies - Manayunk, PA

      While visiting Philadelphia for the holidays, my cheesesteak experience may have been a disappointment, but it was followed up by, quite possibly, one of the best sandwiches I have ever had.  We went to visit some of my husband's friends in Manayunk, just outside of Philadelphia, and met up with them at Lennie's Hoagies.  One of Luke's friends swears by Lennie's and I believe he reigns as mayor of the place since he checks in on four square so often.  I can see why he would visit Lennies often, even more than once in a day, because it was more than satisfactory and delicious.  Everyone at our table was more than pleased with their sandwich and it left me wishing Lennies Hoagies would set up shop in Boulder.
      Lennies Hoagies is a sub shop with a combination of hot and cold sandwiches, highlighting Italian meats and melts stuffed with exuberant amounts of fresh cut meats and delicious, gooey cheeses.  The meat and cheeses are delicious and the subs are topped with lettuce, tomato, onions, oil and seasoning.  Not only are the meats, cheeses, and vegetables fresh, but the bread was delicious as well.  I got so excited about my hoagie just by looking at it, I forgot to take a photo of the deliciousness until I was 3/4 of the way through.  
      Boulder has a similar sub locale, Snarfs, that adds the delicious oils and seasonings, but the selection at Snarfs fails by comparison to that of Lennies...and that is saying something.  I am officially sold on Lennies and would definitely eat there again the next time I am in the Manayunk area.  If you are ever in Philly area it is worth the stop. This is a place you definitely need to try.

      Bon Appetit and Bon Voyage!

      Monday, December 19, 2011

      A True Philly Cheesesteak

      Today's adventure began about a year ago when I realized I had been to Philadelphia multiple times and still had not tried a true Philadelphia Cheesesteak.  Yes, I have had a "cheesesteak"in other parts of the country, but apparently they fail by comparison to a cheesesteak in Philadelphia. So over a year ago, my husband and I determined that the next time I was in Philadelphia we would make it a personal mission for me to eat a true cheesesteak.

      Well, we are back in Philly for the holidays, and today we embarked on a mission to provide my tastebuds with the wonders of Philly Cheesesteaks.  First my Philly coaches instructed me on how to order a cheesesteak...I wouldn't want to agitate anyone in line behind me.  We determined I like onions but then I needed to decide what type of cheese I would get....this is where I ran into a problem.  I love provolone and I don't enjoy fake cheese, aka Cheez Whiz, BUT the big deal with Philly Cheesesteaks is the inclusion of the Whiz...what am I to do?  Provolone Wit or Whiz Wit?

      If you know me well, you know I have issues making decisions about what to have for any meal...so having to decide between provolone and whiz was a BIG DEAL.  So to solve my problem I polled friends on Facebook...and although the majority said Wiz, my tummy was leaning toward provolone.

      SO, we get to Tony Luke's and I decide to use my Philly Cheesesteak Newbie status to get 1/2 provolone wit and 1/2 wiz wit and was shot down.  Disappointment #1.  So I ended up ordering provolone wit.  Sad day for me, my sandwich arrived as a provolone witout...BUMMER.  Disappointment #2.  I assumed it would still be delicious but honestly, nothing striking.  So I try my sister-in-laws wiz witout and my husband's wiz wit...really, nothing amazing...  To make sure I was not losing my mind I have my husband try my sandwich to make sure I am not being picky.  He takes a bite, thinks about it, then looks at me and says, "You got screwed."

      So there you go.  All this hype and no glory.  It was a let down and full but not satisfied.  I can see how a provolone wit has potential to be tasty, but still not worth all the talk.  Sorry Philly natives, I know you find pride in your cheesesteaks, but I can't say I enjoyed it.  I do love how emotionally connected Philadelphians are with their cheesesteaks, and I appreciate how protective they are of this glorified sandwich.  My first experience was a bust, but I haven't given up complete hope.  Next time around I will try John's Roast Pork in South Philly.  I was guaranteed a cheesesteak there is better than anywhere else.

      On the plus side, my poor cheesesteak experience was followed up by a wonderful hoagie from Lenny's in Manyunk.  Now this is a place you need to try... Look for my next post about this delicious sandwich and a delicious brewery in downtown Philadelphia!

      Bon Appetit and Bon Voyage!

      Wednesday, December 14, 2011

      Roasted Tomato & Vegetable Soup

      Sorry I have been slacking with posting recipes! 
      I love homemade soups but find I don't make them often enough, so in the new year I am going to try to pack my diet with more variety of homemade soups and salads.  Not only are they delicious and easy to make, but soups are also so very healthy!  This soup in particular is very easy to make and delicious.  Perfect for a cold winter day.

      This Roasted Tomato Soup recipe is something I made quite some time ago and absolutely loved it.  It came from my Biggest Book of Soups and Stews cookbook from Better Homes and Gardens, and I can never go wrong with something from this cookbook. Although hearty, it is overall a very light soup but packed with wonderful flavors.  The fire roasted tomatoes give it a delicious smokey flavor and the mass amounts of vegetables make it really healthy which is a plus!  I hope you enjoy!

      Roasted Tomato & Vegetable Soup
      Makes 6 servings - 30min prep and 25min cook time

      Ingredients
      •  2 T Olive Oil
      • 1-1/4 C onions, chopped
      • 1 C sliced celery
      • 3/4 C carrot, chopped
      • 2 cloves garlic, minced
      • 6 C chicken broth
      • 2 C butternut squash, peeled, seeded and chopped
      • 1 14oz. can fire roasted diced tomatoes, undrained
      • 1 15oz. can white kidney beans(cannelini or great northern works too), rinsed and drained
      • 1 medium zucchini, halved lengthwise and sliced into half moons
      • 1 C small broccoli florets, fresh
      • 1 C small cauliflower florets, fresh
      • 1-1/2 t fresh oregano OR 1/2 t crushed dried oregano
      • black pepper to taste
      • Freshly grated parmesan cheese (optional for garnish)
      Directions
      • In a 4 qt. dutch oven heat the oil over medium heat.  Add onions, celery, carrot, and garlic.
      • Cook and stir over  medium heat for 5 minutes
      • Stir in broth, squash and undrained tomatoes
      • Bring to a boil and reduce heat.  Simmer while covered for 20 minutes
      • Add beans, zucchini, broccoli, cauliflower, oregano, and pepper and mix in
      • Cook for 5 minutes more
      • Scoop into bowls and sprinkle each serving with parmesan cheese if desired.

      Thinking about it, this soup could also be delicious if served over a cheese tortellini.  I haven't tried it, but if you wanted to make it a bit heartier then that could be a good way to do it.  Let me know if you like it!

      Bon Appetit!